Similar to buying a used car, it looks OK, but you will find points incorrect under the bonnet. As an example, some pictures employ a poor level of comparison, in the event that you start to work on the colouring process right away, areas of your picture will start to have really wishy washey, limey colours which doesn’t look genuine, aside from realistic.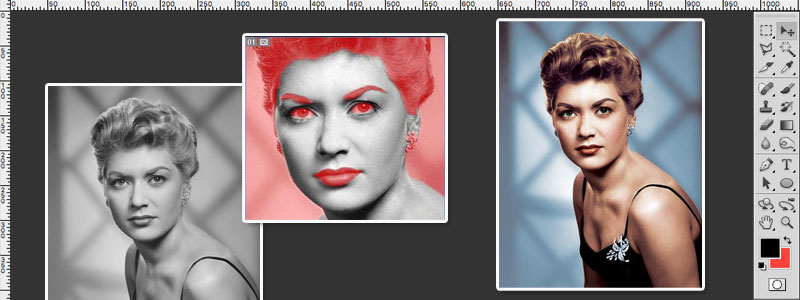
I spend a great time using the original picture, and restoring and correcting these small niggles, such as for example flecks, faded parts, and delicate emphasis areas. These foundations could make the colour method not only more enjoyable for the restorer, but the previous image, come colouring time, will have this organic, unhealthy look, with the correct comparison and levels. Which is important whenever using skin colors, as there’s little retouching to be done.
I also ensure that you rarely, if ever, perform with the brightness/contrast of parts of one’s image. This really is like enjoying God along with your image, and is only going to make the transformation look strange farther down the line. It’s a simple mistake to produce; Legs, Boots or other areas near the bottom of the picture might have this pale look to them. It could be common sense to spotlight these parts of the photo and darken them a feeling, however that produces strange and unpleasant components once you search at your picture as a whole. The visual’data’that you are provided having an old photograph is important to help keep because it is. You are able to modify levels, comparison all together, and do much more to revive that old household picture. But toying with lightness can be a harmful sport, and can some one jeopardize the entire restoration work.
I am sure right now you are scratching to start playing around with your pictures in your picture modifying software, and I am thrilled to go through some basic some ideas with you, to assist you increase on your photos. I’ll be using Adobe Photoshop software, but other picture editing application will without doubt have related tools. I am not going to be specialized, and I’m maybe not planning to provide you with lessons on resources – that’s your decision to own enjoyment learning! What I’m planning showing you in this electronic imaging article, is how I use specific methods or features to achieve what I want. On that notice, pictures at the prepared, let us progress!
My first photograph, taken at a morning celebration indoors with flash requires red attention removing, therefore I’d first of all focus in (using possibly my Navigator panel or Focus tool) until I’m pleasantly close enough to focus on the eyes. You can also use your Give Software to move to a precise place to perform on.
There are 1 or 2 ways to get rid of red vision – my process is the absolute most subtle and I use the Comb tool, then choose a brush size sufficient to paint on the red place in the pupils. I use the Shade Mode (Photoshop is generally standard to Standard Mode, which means you will get a strong shade once you paint along with your brush). I utilize the colorize black and white photos method at a reduced opacity – that setting maintains the main detail in the picture but colourizes wherever I choose to put the colour. I choose colour Black to paint with. Once I have decorated over the red attention, I zoom out somewhat to view how a image is looking – make any final variations and that’s it!
Another technique you could use could be the Ellipse Collection Tool – to pick equally red aspects of the pupils and add a feather of state 1 to get the sharpness off the choice edge. Then using the Hue/Saturation feature underneath the Picture Selection, you may modify the Desaturation of the colour until the red disappears.
Another technique, which is equally as good, possibly even a feeling better, should be to pick round the pale epidermis areas utilising the Polygon Lasso Instrument (or related collection tool). When your collection is manufactured, work with a Feather of about 6. What the feather feature does is softens or feathers the ends of the choice for an even more natural look. With the feathered choice effective, utilize the Improve feature and enter a minus determine before you are happy with the result. You might find the outlined place within your variety today darkening.